For a project I needed to detect faces in real-time from a webcam feed. An obvious choice for this is to use OpenCV, one of the most widely used open source computer vision libraries. There are many posts and tutorials on how to do this, most of them using the Python wrapper. There are also some good C# wrappers for OpenCV, like Emgu CV and OpenCvSharp but documentation and information is a bit sparse.
Most examples, even quite recent ones, use the Haar Cascade classifier for face detection. Whilst Haar Cascades were good at the time, they are now considered outdated and legacy. They are fast but not very accurate and have a lot of false positives. They also struggle with faces that are not looking directly at the camera or with faces that are partially covered. Since Haar Cascades there have been lots of new algorithms. Most, if not all, modern algorithms are based on Deep Neural Networks (DNN). These algorithms are much more accurate and have less false positives, but some are much slower than Haar classifiers and are therefore not suitable for real-time detection. However, some of the newer algorithms are fast enough to be used in real-time applications. Much more background information and a comparison of different algorithms and models can be found in this article.
For my project I needed a fast and accurate face detection algorithm that performed well in uncontrolled environments, because faces would almost never look directly into the camera. Based on these specs a DNN model called YuNet would be an excellent candidate. OpenCV DNN supports YuNet out of the box, which should make it easy to use. However, there are currenly no examples on how to use YuNet with OpenCV in C#, so let’s sort that out.
Wrapper
At the time of writing it seems that OpenCvSharp does not support YuNet but luckily Emgu CV does. Emgu CV is a cross platform .NET wrapper for OpenCV and is actively maintained. Note that it uses a Dual License model, which means that it is free to use in open source projects but requires a license for usage in commercial closed source projects.
Implementation
First, create a new .NET 7 console application and install the Nuget packages Emgu.CV and Emgu.CV.runtime.windows. For this example version 4.7.0.5276 is used.
Then, get a webcam stream. This is quite easy with Emgu CV. The following code snippet will open the default webcam, capture the frames and display them in a window:
using Emgu.CV;

var windowName = "Face detection (Press any key to close)";
CvInvoke.NamedWindow(windowName);

using var capture = new VideoCapture(camIndex: 0);
while (CvInvoke.WaitKey(1) == -1)
{
    var frame = capture.QueryFrame();
    if (frame is null)
    {
        break;
    }

    CvInvoke.Imshow(windowName, frame);
}
Add the face detection model. For this, download the ONNX file from the OpenCV Model Zoo here and pass the file name to the face detector. Place the following line below the initialization of the VideoCapture since we need to pass the width and height of the video to the model:
using var model = new FaceDetectorYN(
    model: "face_detection_yunet_2022mar.onnx",
    config: string.Empty,
    inputSize: new Size(capture.Width, capture.Height),
    scoreThreshold: 0.9f,
    nmsThreshold: 0.3f,
    topK: 5000,
    backendId: Emgu.CV.Dnn.Backend.Default,
    targetId: Target.Cpu);
The model can now be used to detect faces in each frame:
var faces = new Mat();
model.Detect(frame, faces);
The faces variable is a matrix of all detected faces. Each row contains the data of a face: bounding box, landmarks and confidence score. Draw the bounding boxes on the frame:
if (faces.Rows <= 0)
{
continue;
}
var facesData = (float[,])faces.GetData(jagged: true);
for (var i = 0; i < facesData.GetLength(0); i++)
{
var faceRectangle = new Rectangle((int)facesData[i, 0], (int)facesData[i, 1], (int)facesData[i, 2], (int)facesData[i, 3]);
CvInvoke.Rectangle(frame, faceRectangle, new MCvScalar(0, 255, 0), 1);
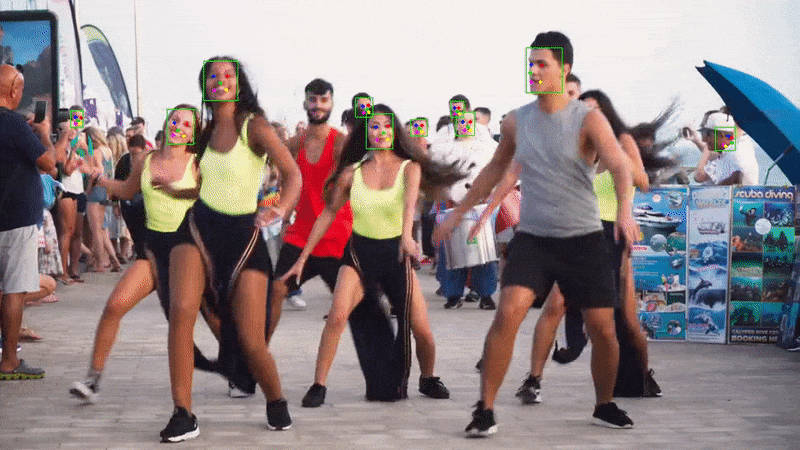
}Run the application and you should see the webcam feed with bounding boxes around the detected faces.
Finishing up
Let’s clean up the code a bit, draw all landmarks and allow reading from a video instead of a webcam. Instead of passing a camera index to the VideoCapture constructor we can pass a file name.
The full Program.cs now looks like this:
using Emgu.CV;
using Emgu.CV.CvEnum;
using Emgu.CV.Dnn;
using Emgu.CV.Structure;
using System.Drawing;

var useWebcam = true;
var pathToVideo = "examples/dancers.mp4";
var renderConfidence = true;

var windowName = "Face detection (Press any key to close)";
CvInvoke.NamedWindow(windowName);

using var capture = useWebcam
    ? new VideoCapture(camIndex: 0)
    : new VideoCapture(fileName: pathToVideo);

using var model = InitializeFaceDetectionModel(new Size(capture.Width, capture.Height));

while (CvInvoke.WaitKey(1) == -1)
{
    var frame = capture.QueryFrame();
    if (frame is null)
    {
        break;
    }

    var faces = new Mat();
    model.Detect(frame, faces);
    DrawDetectedFaces(frame, faces, renderConfidence);

    CvInvoke.Imshow(windowName, frame);
}

FaceDetectorYN InitializeFaceDetectionModel(Size inputSize) => new FaceDetectorYN(
    model: "face_detection_yunet_2022mar.onnx",
    config: string.Empty,
    inputSize: inputSize,
    scoreThreshold: 0.9f,
    nmsThreshold: 0.3f,
    topK: 5000,
    backendId: Emgu.CV.Dnn.Backend.Default,
    targetId: Target.Cpu);

void DrawDetectedFaces(Mat frame, Mat faces, bool renderConfidence)
{
    if (faces.Rows <= 0)
    {
        return;
    }

    // facesData is multidimensional array.
    // The first dimension is the index of the face, the second dimension is the data for that face.
    // The data for each face is 15 elements long:
    //  - the first 4 elements are the bounding box of the face (x, y, width, height)
    //  - the next 10 elements are the x and y coordinates of 5 facial landmarks:
    //      right eye, left eye, nose tip, right mouth corner, left mouth corner
    //  - the last element is the confidence score
    var facesData = (float[,])faces.GetData(jagged: true);

    for (var i = 0; i < facesData.GetLength(0); i++)
    {
        DrawFaceRectangle(frame, (int)facesData[i, 0], (int)facesData[i, 1], (int)facesData[i, 2], (int)facesData[i, 3]);
        DrawFaceLandMarks(frame, i, facesData);

        if (renderConfidence)
        {
            DrawConfidenceText(frame, (int)facesData[i, 0], (int)facesData[i, 1] - 5, facesData[i, 14]);
        }
    }
}

void DrawFaceRectangle(Mat frame, int x, int y, int width, int height)
{
    var faceRectangle = new Rectangle(x, y, width, height);
    CvInvoke.Rectangle(frame, faceRectangle, new MCvScalar(0, 255, 0), 1);
}

void DrawFaceLandMarks(Mat frame, int faceIndex, float[,] facesData)
{
    var landMarkColors = new MCvScalar[]
    {
        new MCvScalar(255, 0, 0),   // right eye
        new MCvScalar(0, 0, 255),   // left eye
        new MCvScalar(0, 255, 0),   // nose tip
        new MCvScalar(255, 0, 255), // right mouth corner
        new MCvScalar(0, 255, 255)  // left mouth corner
    };

    for (var landMark = 0; landMark < 5; landMark++)
    {
        var x = (int)facesData[faceIndex, 4 + landMark * 2];
        var y = (int)facesData[faceIndex, 4 + landMark * 2 + 1];
        CvInvoke.Circle(frame, new Point(x, y), 2, landMarkColors[landMark], -1);
    }
}

void DrawConfidenceText(Mat frame, int x, int y, float confidence)
{
    CvInvoke.PutText(frame, $"{confidence:N4}", new Point(x, y), FontFace.HersheyComplex, 0.3, new MCvScalar(0, 0, 255), 1);
}
And that’s it! You can now detect faces in images, webcam feeds and videos using the YuNet model.
Example output with landmarks:
Full code
Ready to run code example can be found on GitHub: https://github.com/mawax/face-detection-yunet/